Showing posts with label Tongue and groove pine. Show all posts

Shawnee Lane New Build

It rained today so while I had some free time I took the opportunity to take some pictures of a home we built a few years ago on Shawnee Lane in Hide-A-Way Hills.

The owners on this project had a cabin on Lake Eagle Claw that they wanted to tear down and build a new home closer to the water.


With the new house located closer to the water, we had to design a switch back driveway because of the steep angle of the lot.

Left Side Front


The house is sided with T-111 siding and roofed with 30 year dimensional shingles.


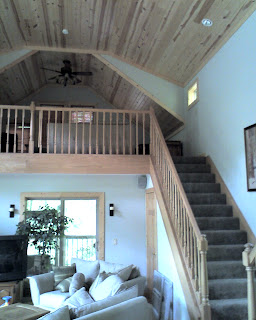
We used oak spindles, handrails, and trim to complete the twin stairways that lead to lofts on either end of the house.


Twin Stairs


Down From Big Loft


Back Doors


Back Deck

Completed Porch

The porch on Kusa is nearly complete. We installed the tongue and groove pine ceiling, covered it with plywood , and laid the fiberglass shingles.


Back Porch Roof

We installed the Roof on the Back Porch of our Nelsonville new build. We wanted to use the same tongue and groove pine that we had used throughout the project. Because the pine would be both the ceiling and roof, we installed it from above. Before the metal roofing could be applied, the pine had to be covered with a layer of plywood. With this process, we were assured the screws would not show through the ceiling.

Back Porch

We have begun work on the Back Porch in Nelsonville. To continue the theme from the post and beam front porch, we again used rough cut lumber from an Amish sawmill. 2x8 rafters along with a tongue and groove pine ceiling will be completed with the same green metal roof as the rest of the house.


Pine Floor

Recently, we installed the floor in the living room and kitchen at our Nelsonville new build. The material is Southern Yellow Pine in a seven inch wide tongue and groove plank. The owners decided to tackle this project themselves over the week end. They installed the floor unfinished and will sand, stain, and finish later.


Porch Ceiling

We have not been truly satisfied with the look of the post and beam porch ceiling since it was built. The design called for the underside of the metal roof to show between the purlins, but the underside of the green metal is white and does not fit with our color scheme.

The tongue and groove pine on the inside exceeded our expectations so we decided to use the same material on the porch.


Ceiling Day 11

The tongue and groove pine is virtually completed on the inside of the house. Tomorrow we will begin installing pine outside on the porch ceiling.


Ceiling Day 10

The tongue and groove pine was completed on the bay window and the gable above it today. One more day of installation should finish up this portion of the project.


Ceiling Day 9

We have finally finished the high ceiling at our Nelsonville new build and have began to start the living room walls and bay window area. We are really starting to achieve the hunting lodge aspect that we have been looking for since we began the design process.

Ceiling Day 7

A few more pictures as we continue on with the ceiling in Nelsonville.


Ceiling Day 5

With a week of working with tongue and groove pine under our belts we have the front half of the ceiling installed, the master dormer and master bath ceiling done. We now are ready for another load of lumber to start applying urethane.


Ceiling day 4

Today we worked our way up into the loft of the master bed room and started working on the dormer.


Ceiling day 3

Today we made some more progress on the ceiling. The peak is 21' from the floor of the living room and as we get closer to the top the work goes a little slower.


Ceiling day 2

Today we worked on the area where the roof lines of the front porch and the house come together. This compound mitre proved to be tricky but provided an excellent look.

Wood Ceiling

We have began installing the tongue and groove pine ceiling at the Nelsonville new build. As we work on it over the next several days I will post pictures of the progress.


div>

Polyurathane


The cathedral ceilings and some of the walls are going to be finished with tongue and groove pine barn-siding at our Nelsonville new build. We opted for a natural finish to let the grains and colors of the wood show through. Two coats of water based Polyurethane were applied to protect the wood. The Clear Satin finish will give the pine a light golden tone and allow it to naturally darken over the years to come.

A-Frame


In the summer of 2005, we took on a remodel addition project on H-A-H Lane in Hide-A-Way Hills.The owners had bought an a-frame cabin that had been unoccupied for several years. As with a lot of projects of this type, the scope of the job expanded as it went on. What started out relatively small, snowballed into a major reconstruction as we found more things needed replacing. It might almost have been less expensive to tear it down and build a new house, but we wouldn't have ended up with a home with anywhere near the character of this one. By project completion we had accomplished the following:
-Built a dormer,installed skylights, and re roofed the house.
-Built a 16'x16' addition on a basement.
-Put in all new plumbing. electrical, and a furnace.
-Installed new windows and doors.
-Created a brand new kitchen and bath.
-Covered the ceilings with tongue and groove pine and the floors with oak hardwood.
-Built over 400 sq. ft of new decks.

First Project


Back in the summer of 2002, I resigned from Apco Sidings, a company I had worked at for 18 years. I started Scott Martin Construction and began work on our first project a new home on Osage Lane, here in Hide-A-Way Hills, Ohio.

Hand framing, custom cabinetry, tongue & groove pine ceilings, and tiled and hardwood floors are some of the architectural features that have become a standard in our work.